HOME | BOOSTER | CEMETERIES |
EDUCATION
| GHOST TOWNS
| HEADSTONE
MINOTTO |PICTURES | ROADS | JACK SWILLING | TEN DAY TRAMPS
Presentation
Making Your Own Headstone
Where Silence Has Lease
Version 120312
Restoring dignity, honor and respect is the goal of the Arizona Pioneer Cemetery Research Project (APCRP). The not-for-profit, volunteer organization, founded in 2004 by Neal Du Shane of Fort Collins, Colorado and winter resident in Arizona, APCRP has researched, identified and located abandoned derelict cemeteries and graves of our Pioneer founders primarily in the Southern Bradshaw Mountains. But plans are in place to expand this concept state wide.
In an effort to identify the resting places of our Pioneer founder’s detailed research is completed by reading historical books and articles. County offices and historical societies are enlisted to garner facts.
Once
identified and located, a method of documentation of the grave sites are used
and each grave is marked. In these remote cemeteries (some 159) there are very
few headstones, if there were any, to record information. Researching
historical documents is the key to documentation. Many of these graves are hard
rock miners and pioneers that helped settle
However for those we can document the goal of APCRP is to try and preserve dignity, honor and respect of the interred for the future generations by creating a marker at the grave site.
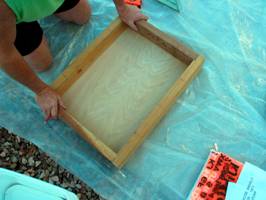
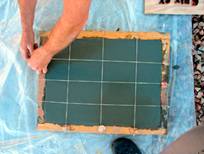
Gary Grant Constructed Frame
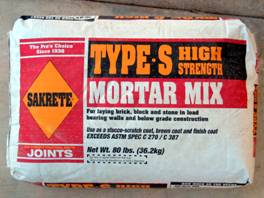
The process is simple and inexpensive. We start with an 80 lb. bag of Sakrete Mortar Mix (no aggregate) other brands will work but must be Mortar Mix. Build a frame approximately 21” X 16” using 2” X 4”’s screwed together at the corners for easy removal once the mortar has set. Its not necessary to use a plywood back as pictured above, in fact we no longer use it – as it tended to retain water in the mix, but is handy if you want to move the marker before its set up. An 80 lb. bag of mortar mix will fill a 21” X 16” X 4” frame with no left over cement.
We purchase a set of “Stamp
Letters” that press into the wet cement to finish off the equipment. Once all
materials have been 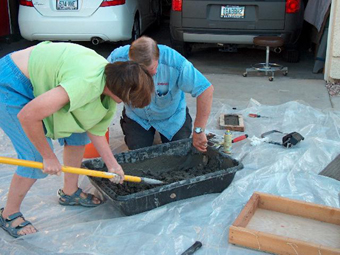 prepared, lay out the person’s name,
punctuation, date of Birth and Death: sized to accommodate the space. Lay the
frame on a sturdy level surface and put plastic under the frame.
prepared, lay out the person’s name,
punctuation, date of Birth and Death: sized to accommodate the space. Lay the
frame on a sturdy level surface and put plastic under the frame.
Once all the preparation has been finalized its time to add water to the mortar. The tendency is to add too much water to the mix, if you do, the letter depressions will fill with water and diminish the quality and detail of the letters. Be ultra conservative on adding water. You can add more water – you can’t take water back once added. Too much water weakens the strength of the headstone/marker.
Beckie
Grant & Neal Du Shane Mix Mortar Mix
Sakrete recommends 5 liters of water to a 80 lb bag. Measure
the water you add – don’t guess! You want consistency of Very Thick Peanut
Butter not French Onion Soup. The
reason you want a very dry mix is that if its not dry once you press the
letters in the cement with a wet mix, water will pool in the impressions of the
letters and ruin the presentation.
Sakrete points out using cold water reduces the set up
time and increases the time you have to work with the product. Using warm water
increases the set up time but reduces the time you have to work with the
product. I prefer the longer working time.
Once you have the mix worked and the consistency of Peanut Butter its time to shovel the mixture into the frame. (if the water/mortar mix is correct and you followed the directions on the bag, you have to shovel it, you can’t pour it, its too thick.)
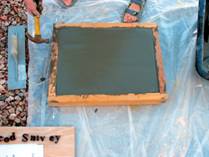
Fill the frame to the top, smooth and level the cement with a trowel or piece of wood.
Use a hammer to vigorously pound all four edges of the inside of the frame, yes your hammering the mortar into all edges to eliminate any voids. This will get the mortar to settle in the corners and to the bottom edges. Re-level the mortar and screed to bring the cream to the surface.
Keep in mind, elapsed time is a factor you should consider once the mortar has been mixed. We have found that if you use the water content suggested on the bag, you have about one half hour to forty five minutes to get your letters pressed into the surface. This will depend on cold or warm water you use in the mix and humidity.
 Some people can free hand the placement of
the letters. We use string and or a stick to create a straight edge to help
keep the placement of the letters in a line and somewhat straight. The key is
to have laid out your letters prior to pressing them in the cement and keeping
them clean after each letter impression.
Some people can free hand the placement of
the letters. We use string and or a stick to create a straight edge to help
keep the placement of the letters in a line and somewhat straight. The key is
to have laid out your letters prior to pressing them in the cement and keeping
them clean after each letter impression.
Wetting the letters or spraying Pam on them helps in the release from the mix.
Wash each letter after pressing in the mortar. Keep a bucket of fresh water close at hand to wash the letters after each use. If this isn’t done the letters over time will accumulated cement residue and loose their sharpness for future use.
It is critical that you lay out
your letters and numbers that you are going to use, in an orderly manner (you’ll only NOT do this once!) before
mixing the cement. 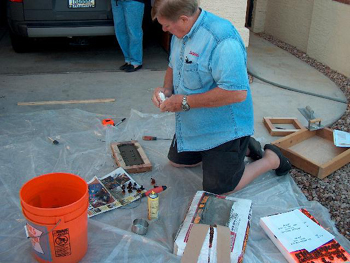 All of us have placed a wrong letter of
misspelled a name, but correcting an error isn’t easy. Make sure you have it
right the first time. “Cutting it three times and it is still too short” isn’t
what you want to do. It is possible you have just created your new boat anchor
and you will have to start over.
All of us have placed a wrong letter of
misspelled a name, but correcting an error isn’t easy. Make sure you have it
right the first time. “Cutting it three times and it is still too short” isn’t
what you want to do. It is possible you have just created your new boat anchor
and you will have to start over.
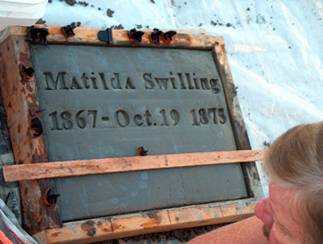
After pressing the letters and numbers, inspect for any imperfections – and make adjustments as needed. Let your creation cure. Normally we let it set for two days before unscrewing and removing the 2”X4” frame. Stand the block of cement on edge to allow the back evaporate water from the cement. Let it stand in this configuration another two days. After removing the frame you can use a brick or similar object to remove any imperfections on the edges. We recommend letting the marker set and cure undisturbed, at least a week before moving it to its final place of residence. The older cement gets the stronger it is.
Rebar, fiberglass bits or wire can
be added to the mortar in the frame to add strength. If you stand the headstone
 vertical we would recommend adding rebar.
Laying the headstone horizontal in the ground doesn’t require extra strength.
vertical we would recommend adding rebar.
Laying the headstone horizontal in the ground doesn’t require extra strength.
Assuming you have no cement working tools or Stamp Letters to press into the wet mortar the initial investment will be under $50.00 but can be used time and time again if washed and cleaned properly. One 2”X4”X 8’ is less than $2.00 and can be reused many times before needing replacing. Total expenditure, once letters, trowels and wood have been purchased is under $6.00 for the bag of mortar, per headstone/marker.
Consider laying these markers horizontally, digging out an inch or two in the ground to lay them in. Placing them upright will invite cattle and wild life to use them as scratching posts and they will topple over time.
Cemetery Coordinators and other organizations that make their own headstones remark they have seen these last 75 to 100 + years.
Being a perfectionist doesn’t factor into this process – imperfections add authentic reality to your project.
It should also be pointed out that APCRP does not disturb or deface the graves in any way; rather APCRP provides identification, dignity and honor to our heritage.
Neal Du Shane – Taphopile and Founder, APCRP - MCPCRP
SOURCES:
Press-In Letters: http://www.magneticpoetry.com/ Click on Poetry Stones tab, then scroll down to Poetry Stones Accessories. Click on that link and you will find the 3 styles of Press-In Letters. Each has a finger handle on the back of text or number. We use a combination of three different sizes. We recommend:
11760 Traditional Times Font Upper Case (approx. 1.5" tall),
11761 Traditional (Times Font Lower Case),
11722 Classic (Copperplate Font Upper Case) Only approx. .75" tall.
Avoid Old English style letters as there is too much detail and you won’t get good results. The simpler the font style the better.
Sakrete: available at Lumberyards – Big Box Stores – some Hardware Stores – regardless of the brand, make sure to get a Mortar Mix (sand and concrete only) you do not want aggregate (rock) in the mix. 80 Lbs or mortar will fill the frame with nothing left over if you use a 21”X 16” frame.
Cement Tools: 1. Trowel, 2. Corner Edger, 3. Float, 4. Tuck Point, 5. Hoe, 6. Plastic Tub to mix cement/water available at Hardware Stores – Lumberyards – Big Box Stores. The smaller size you buy these tools the better. Remember you are only working in a 21” X 16” area.
Lumber: 8’ 2” X 4” available at Big Box Stores or Lumber Yards. One scrap straight stick to be used as a straight edge.
Plastic: Large Garbage Bags will work for the bottom of the frame. A 20’ X 20’ drop cloth for any spills in the area is also use full.
Newspaper: Any old newspaper thick enough to absorb water is best placed on a hard surface, between the garbage bag and cement.
Water buckets: have two or three 5 gallon buckets, filled half full with water for washing tools and letters/numbers.
Water Container: we used two, two liter plastic soda bottles and one, one liter plastic container to measure the water in poured into the mortar mix.
Filling the two liter bottles twice = 4 liter
Filling the one liter bottle once = 1 liter
Giving you a total of 5 liters to add to the mortar mix.
August 5, 2007 by: Neal Du Shane
WebMaster: Neal Du Shane
120312
HOME | BOOSTER | CEMETERIES |
EDUCATION
| GHOST TOWNS
| HEADSTONE
MINOTTO |PICTURES | ROADS | JACK SWILLING | TEN DAY TRAMPS
How to make a headstone.doc